
In this part, we will see how to install and configure Hadoop (2.7.1) and Spark (1.5.1) to have one master and four slaves.
The configurations in this part are adapted for MinnowBoard SBCs. I tried to give as much explanations on the chosen values, which are relative to the resources of this specific cluster. If you have any questions, or if you doubt my configuration, feel free to comment. 🙂
We start by creating a user which we will use for all Hadoop related tasks. Then we will see how to install and configure the master and slaves. Finally we will finish by running a simple MapReduce job to check that everything works and to start being familiar with the Hadoop ecosystem.
Contents
Installing Hadoop
Setting up a new user for Hadoop
First, create a user for Hadoop and add it to the list of sudoers :
## Create group hadoop and add hduser to the group
$ sudo addgroup hadoop
$ sudo adduser --ingroup hadoop hduser

## Edit the sudoers file to add hduser
$ sudo visudo
Add this to the last line of the visudo file : hduser ALL=(ALL:ALL) ALL
Then login with the newly created user and generate a password-less SSH key. Also add it to the list of authorized keys so that it can connect to itself without a password :
$ su - hduser
$ ssh-keygen -t rsa -P "" -f id_rsa
$ cat .ssh/id_rsa.pub >> .ssh/authorized_keys
After creating the user on all hosts, we must make sure that the master host can freely log in without prompt to any other hosts (which will be the slave nodes) to be able to launch commands via SSH.
In my case, ubuntu0 is the master, and I had to run the following command for each of the other hosts :
hduser@ubuntu0:~$ ssh-copy-id -i ~/.ssh/id_rsa.pub ubuntu1
hduser@ubuntu0:~$ ssh-copy-id -i ~/.ssh/id_rsa.pub ubuntu2
hduser@ubuntu0:~$ ssh-copy-id -i ~/.ssh/id_rsa.pub ubuntu3
hduser@ubuntu0:~$ ssh-copy-id -i ~/.ssh/id_rsa.pub ubuntu4
If you created a data partition for Hadoop like I did, you should also change the mount point’s ownership on each host, since hduser will be doing all the writing and reading:
$ sudo chown -R hduser:hadoop /data
Now that hduser has all the necessary rights, create a few directories which will be used for HDFS.
For the master host :
$ mkdir /data/tmp /data/namenode
For all slave hosts :
$ mkdir /data/tmp /data/datanode /data/userlogs
Hadoop Setup
Download and extract Hadoop to hduser’s home folder.
$ cd ~

## Download from apache repository
$ wget http://www.us.apache.org/dist/hadoop/common/hadoop-2.7.1/hadoop-2.7.1.tar.gz

## Extract the archive
$ tar -zxf hadoop-2.7.1.tar.gz

## Rename to simple name 'hadoop'
$ mv hadoop-2.7.1 hadoop
Now we need to define some environment variables. Edit ~/.bashrc to add the following lines at the end :
# Java and Hadoop variables
export HADOOP_HOME=/home/hduser/hadoop
export JAVA_HOME=/opt/jdk/jdk1.7.0_21/
export PATH=$PATH:$JAVA_HOME/bin:$HADOOP_HOME/bin:$HADOOP_HOME/sbin
export HADOOP_CLASSPATH=${JAVA_HOME}/lib/tools.jar
Then edit ~/hadoop/etc/hadoop/hadoop-env.sh to set the JAVA_HOME line to :
export JAVA_HOME=/opt/jdk/jdk1.7.0_21/
The following parts will explain how to configure the master and slaves to have HDFS and YARN up and running.
Configuration Files
Configuration files are always in ~/hadoop/etc/hadoop/ whether it’s for the master or a slave.
There are 4 xml configuration files that we will be using on the master and slaves. Here are their names, with links to their references containing the default values and explanations :
Configuration for the Master
Update the contents of the following files (the file name is indicated in title of each code snippet window) :
<configuration>
    <property>
        <name>fs.defaultFS</name>
        <value>hdfs://ubuntu0:9000</value>
    </property>
    <property>
        <name>hadoop.tmp.dir</name>
        <value>/data/tmp</value>
    </property>
</configuration>
<configuration>
    <property>
        <name>dfs.replication</name>
        <value>2</value>
    </property>
    <property>
        <name>dfs.namenode.name.dir</name>
        <value>/data/namenode</value>
    </property>
</configuration>
<configuration>

    <!-- YARN master hostname -->
    <property>
        <name>yarn.resourcemanager.hostname</name>
        <value>ubuntu0</value>
    </property>

    <!-- YARN settings for lower and upper resource limits -->
    <property>
        <name>yarn.scheduler.minimum-allocation-mb</name>
        <value>512</value>
    </property>
    <property>
        <name>yarn.scheduler.maximum-allocation-mb</name>
        <value>2048</value>
    </property>
    <property>
        <name>yarn.scheduler.minimum-allocation-vcores</name>
        <value>1</value>
    </property>
    <property>
        <name>yarn.scheduler.maximum-allocation-vcores</name>
        <value>4</value>
    </property>

    <!-- Log aggregation settings -->
    <property>
        <name>yarn.log-aggregation-enable</name>
        <value>true</value>
    </property>
    <property>
        <name>yarn.log-aggregation.retain-seconds</name>
        <value>86400</value>
        <description>How long to keep aggregation logs. Used by History Server.</description>
    </property>

</configuration>
<configuration>

    <property>
        <name>mapreduce.framework.name</name>
        <value>yarn</value>
    </property>

    <!-- MapReduce ApplicationMaster properties -->
    <property>
        <name>yarn.app.mapreduce.am.resource.mb</name>
        <value>512</value>
    </property>
    <property>
        <name>yarn.app.mapreduce.am.command-opts</name>
        <value>-Xmx500m</value>
    </property>

    <!-- Mappers and Reducers settings -->
    <property>
        <name>mapreduce.map.memory.mb</name>
        <value>512</value>
    </property>
    <property>
        <name>mapreduce.map.cpu.vcores</name>
        <value>1</value>
    </property>
    <property>
        <name>mapreduce.reduce.memory.mb</name>
        <value>512</value>
    </property>
    <property>
        <name>mapreduce.reduce.cpu.vcores</name>
        <value>1</value>
    </property>
    <property>
        <name>mapreduce.job.reduces</name>
        <value>2</value>
    </property>

    <!-- History Server settings -->
    <property>
        <name>mapreduce.jobhistory.address</name>
        <value>ubuntu0:10020</value>
    </property>
    <property>
        <name>mapreduce.jobhistory.webapp.address</name>
        <value>ubuntu0:19888</value>
    </property>


</configuration>
Finally, in the master host you should edit the slaves file, where you can declare all the slaves, one hostname per line :
ubuntu1
ubuntu2
ubuntu3
ubuntu4
Configuration for the Slaves
Update the contents of the following files (the file name is indicated in title of each code snippet window) :
<configuration>
    <property>
        <name>fs.defaultFS</name>
        <value>hdfs://ubuntu0:9000</value>
    </property>
    <property>
        <name>hadoop.tmp.dir</name>
        <value>/data/tmp</value>
    </property>
</configuration>
<configuration>
    <property>
        <name>dfs.datanode.data.dir</name>
        <value>/data/datanode</value>
    </property>
</configuration>
<configuration>

    <property>
        <name>yarn.nodemanager.aux-services</name>
        <value>mapreduce_shuffle</value>
    </property>

    <!-- Link to the master node -->
    <property>
        <name>yarn.resourcemanager.hostname</name>
        <value>ubuntu0</value>
    </property>

    <!-- Available resources for YARN containers on this node -->
    <property>
        <name>yarn.nodemanager.resource.memory-mb</name>
        <value>2048</value>
    </property>
    <property>
        <name>yarn.nodemanager.resource.cpu-vcores</name>
        <value>4</value>
    </property>

    <!-- Log aggregation settings -->
    <property>
        <name>yarn.log-aggregation-enable</name>
        <value>true</value>
    </property>
    <property>
        <name>yarn.nodemanager.log-dirs</name>
        <value>/data/userlogs</value>
    </property>
    <property>
        <name>yarn.log.server.url</name>
        <value>ubuntu0:19888</value>
    </property>
    <property>
        <name>yarn.nodemanager.delete.debug-delay-sec</name>
        <value>86400</value>
    </property>

</configuration>
Notes on these configurations
Here are a few explanations about the different properties, and how/why I chose these values for the MinnowBoard cluster.
HDFS Config
The replication factor dfs.replication defines on how many nodes a block of HDFS data is replicated across the cluster. The default value is 3, but I decided to lower it to 2. Here are the reasons why :
- Higher replication factor means more writing time, so lower performance. I have weak computers with only 1 HDD each, so I shouldn’t abuse of it.
- It also means more disk space used ! Each node has only a small (~400 GB) data partition, so this can become a problem too.
- It is part of HDFS design to have at least one replica in a node from the same rack, and one replica in a node from another rack. This is in case a whole rack fails (for example broken switch), and that is why the default value is 3. In my case there is no need for this rack-aware principle since I only have one rack.
- Having a replication factor of 2 means that I can still loose any slave, or choose to disconnect one slave to do other stuff, and its data will be recovered.
The values dfs.namenode.name.dir on the master, and dfs.datanode.data.dir on the slaves didn’t really need to be specified because by default they are set in the hadoop.tmp.dir directory, which we have defined in the “core” properties to be in our external HDD’s data partition. However if you have multiple HDDs per node, these values can take a comma-separated list of URIs so that the DataNode and NameNode can have better performance by spreading the I/O to multiple disks.
YARN Config
The values set in the master are only lower and upper limits for container resources. YARN applications (such as MapReduce) won’t be able to ask YARN to create containers with amounts of memory and vcores out of these limits.
In the slaves, the memory and vcore values define how much resources the node can lease to YARN containers. For example, you can have 8 GB of RAM on your computer and decide to let YARN use up to 4 GB of RAM by setting yarn.nodemanager.resource.memory-mb to 4096 . In my case, I decided to let YARN use all of my 2 GB of RAM since it’s already very little and I don’t need to save RAM to run other processes on each node.
MapReduce Config
The numerical values (memory, cpu, number of reducers, etc…) have been chosen after testing and tuning the cluster for the WordCount MapReduce job (used in the next part).
My MinnowBoards have 2 GB of RAM each, and I found out that I had the best performance when running 512 MB containers (defined in mapreduce.map.memory.mb and mapreduce.reduce.memory.mb ) which give me 4 containers per node.
The default Hadoop JVM heap options for mappers and reducers seemed to be optimal, so I did not redefine them (value of mapred.child.java.opts ).
However I have reduced the sizes of the container and JVM heap options for the application master (see yarn.app.mapreduce.am.* properties in mapred-site.xml) because it was slower when higher. Probably because in such a small cluster the Application Master doesn’t need so much memory, and it also took up space, preventing more mappers from being created.
What about vCores ?
I have talked about container memory and available RAM in the previous paragraphs about YARN and MR configurations, explaining how I got to 4 containers per node.
But I haven’t talked about vCores, which seem to have a counterpart for each memory property. Well vCores are not used by default in YARN. The container allocation will only take into consideration available vCores if you configure the scheduler to use the DominantResourceCalculator instead of the DefaultResourceCalculator.
vCores can also be used to limit real CPU usage per container on nodes, using cgroups, if you configure YARN to use the LinuxContainerExecutor instead of the DefaultContainerExecutor.
But all of this is complicated and not necessary for a single person to run MR jobs one by one on a tiny cluster.
Log aggregation
By default, log aggregation is deactivated in Hadoop, which means that container logs are stored in the local FS on each node. To view logs you need to go to the directory defined in the yarn.nodemanager.log-dirs property, on each node. These logs are retained during a certain time, defined in yarn.nodemanager.log.retain-seconds .
When log aggregation is activated, YARN NodeManagers (slaves) transfer their container logs to HDFS once an application is finished. The logs are sent by default to the HDFS temporary folder (by default/tmp/logs ) where they are retained during a certain time, defined in yarn.log-aggregation.retain-seconds . After sending the logs to HDFS, the local log files are immediately deleted, unless you still want to keep them on the local filesystem and set the extra retention time property called yarn.nodemanager.delete.debug-delay-sec .
Starting HDFS
When talking about HDFS, the master is called the NameNode, and a slave is called a DataNode.
First, we have to format a new distributed file system using the command on the NameNode :
hduser@ubuntu0:~$ hdfs namenode -format <cluster_name>
Then use this command on the namenode to start the DFS (Distributed File System) :
hduser@ubuntu0:~$ start-dfs.sh

Starting namenodes on [ubuntu0]
ubuntu0: starting namenode, logging to /home/hduser/hadoop/logs/hadoop-hduser-namenode-ubuntu0.out
ubuntu4: starting datanode, logging to /home/hduser/hadoop/logs/hadoop-hduser-datanode-ubuntu4.out
ubuntu1: starting datanode, logging to /home/hduser/hadoop/logs/hadoop-hduser-datanode-ubuntu1.out
ubuntu2: starting datanode, logging to /home/hduser/hadoop/logs/hadoop-hduser-datanode-ubuntu2.out
ubuntu3: starting datanode, logging to /home/hduser/hadoop/logs/hadoop-hduser-datanode-ubuntu3.out
Starting secondary namenodes [0.0.0.0]
0.0.0.0: starting secondarynamenode, logging to /home/hduser/hadoop/logs/hadoop-hduser-secondarynamenode-ubuntu0.out
(To stop HDFS, simply run stop-dfs.sh )
After starting, the NameNode has a web UI to view information about the distributed file system, located by default at http://{MASTER}:50070 . Go to the “Datanodes” page and check that all DataNodes are all in operation. If DataNodes are missing from this page, check the logs for errors on both master and slaves in the directory ~/hadoop/logs .
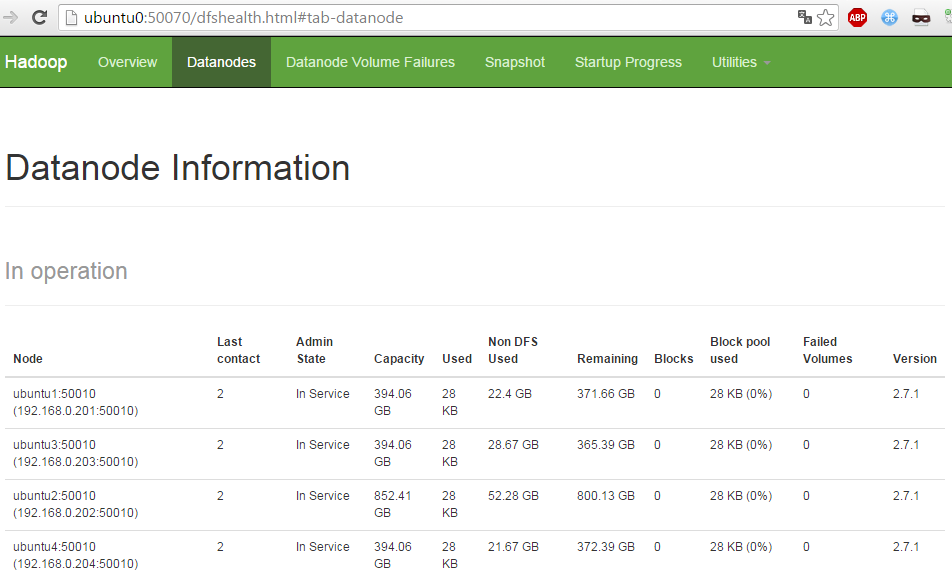
You may also use this UI to browse the contents of the distributed file system.
Before running any jobs, we must create a directoy for our user in HDFS, which will be used for relative paths in MapReduce jobs :
$ hdfs dfs -mkdir /user
$ hdfs dfs -mkdir /user/hduser
Here is the HDFS shell reference.
Starting YARN
When talking about YARN, the master application is called the ResourceManager, and a slave application is called a NodeManager.
To start YARN, simply run this command :
hduser@ubuntu0:/data/namenode$ start-yarn.sh

starting yarn daemons
starting resourcemanager, logging to /home/hduser/hadoop/logs/yarn-hduser-resourcemanager-ubuntu0.out
ubuntu4: starting nodemanager, logging to /home/hduser/hadoop/logs/yarn-hduser-nodemanager-ubuntu4.out
ubuntu1: starting nodemanager, logging to /home/hduser/hadoop/logs/yarn-hduser-nodemanager-ubuntu1.out
ubuntu2: starting nodemanager, logging to /home/hduser/hadoop/logs/yarn-hduser-nodemanager-ubuntu2.out
ubuntu3: starting nodemanager, logging to /home/hduser/hadoop/logs/yarn-hduser-nodemanager-ubuntu3.out
(To stop HDFS, simply run stop-yarn.sh )
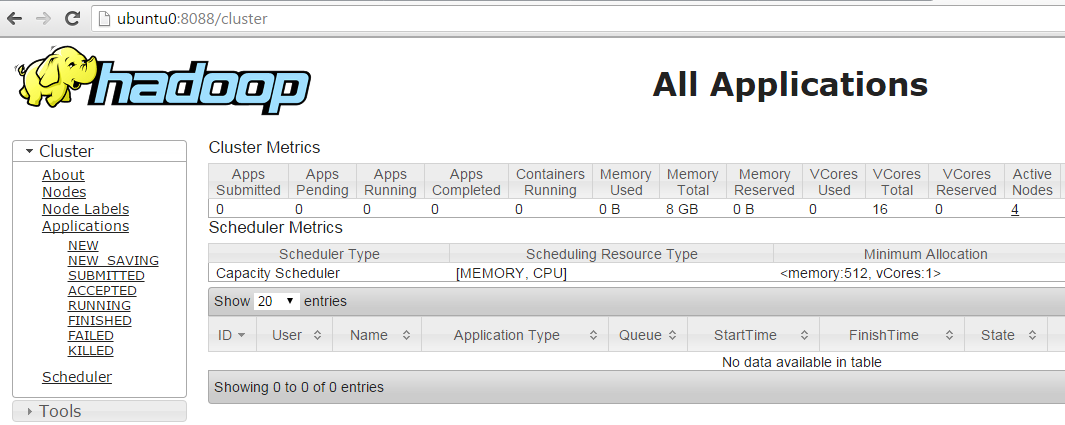
After starting, the ResourceManager has a web UI to view information about the cluster’s jobs, located ny default at http://{MASTER}:8088 . If the “Cluster Metrics” on the first page show 0 active nodes, check the logs for errors on both master and slaves in the directory ~/hadoop/logs .
You may also start the history server :
$ mr-jobhistory-daemon.sh start historyserver
Which will start an UI on at the following address : http://{MASTER}:19888 , which enables you to view information and aggregated logs for all previous MapReduce jobs.
Running a MapReduce example
Now let’s run a MR (MapReduce) job from the example jar which comes with Hadoop.
This example uses MR to estimate the value of Pi using a statistic-based method called QuasiMonteCarlo :
$ yarn jar $HADOOP_HOME/share/hadoop/mapreduce/*examples*.jar pi 50 100
This MapReduce application automatically creates input files in the DFS at /user/hduser/QuasiMonteCarlo_<ID>/in and then results are written in /user/hduser/QuasiMonteCarlo_<ID>/out . You can view this data in the HDFS NameNode UI.
This execution took about 2min 40s on my cluster. During that time, you can check the YARN ResourceManager UI to see that the job has been created. You can also view the created containers on each YARN ResourceManager UI, at http://{SLAVE}:8042 .
When the execution if finished, the command line will output the result (estimated value of Pi). And after that you can view the summary of all previous MR jobs in the MR History Server UI. For each job you may view information and logs about all containers that were created, across all nodes.
You may also get all the aggregated logs on one node by running the command :
$ yarn logs --applicationId application_1445875607327_0008 > pi_app.log
This will create a file pi_app.log containing the aggregation of all container logs.
The application_<app_id> parameter used here can be found in the console ouput, in the ResourceManager UI, or in the History Server UI.
We have run a MapReduce job from hadoop-mapreduce-examples-2.7.1.jar which contains a number of basic application examples to test Hadoop out of the box. In Part IV we will write our own MR application and package our own jar in order to run it on YARN.
But first, let’s finish the last setup process, which is to install Spark, another.
Installing Spark
Spark Setup
While logged in as hduser, download the archive and extract it :
# Go to home folder
$ cd ~

# Download tarball
$ wget http://www.eu.apache.org/dist/spark/spark-1.5.1/spark-1.5.1-bin-hadoop2.6.tgz

# Extract
$ tar -zxf spark-1.5.1-bin-hadoop2.6.tgz

# Rename extracted folder to simple name
$ mv spark-1.5.1-bin-hadoop2.6/ spark
Then we need to update a few environment variables (again, sorry!) in ~.bashrc . The end of the script should look like this (together with the previous Java and Hadoop variables) :
# Java and Hadoop variables
export HADOOP_HOME=/home/hduser/hadoop
export JAVA_HOME=/opt/jdk/jdk1.7.0_21/
export HADOOP_CLASSPATH=${JAVA_HOME}/lib/tools.jar
export PATH=$PATH:$JAVA_HOME/bin:$HADOOP_HOME/bin:$HADOOP_HOME/sbin

# Spark variables
export YARN_CONF_DIR=$HADOOP_HOME/etc/hadoop
export SPARK_HOME=/home/hduser/spark
export PATH=$PATH:$SPARK_HOME/bin
To run Spark on YARN, you only need to do this on the master. To run Spark in Standalone mode, the binaries need to be installed on all nodes, so repeat these steps on each slave.
Spark on YARN
Running a job
Spark also includes an example jar, containing pre-packaged examples. And it also contains the QuasiMonteCarlo Pi estimation example.
This is how I run a spark job on YARN on my MinnowBoard cluster:
hduser@ubuntu0:~$ spark-submit \
--master yarn-client \
--num-executors 4 \
--executor-cores 2 \
--executor-memory 640M \
--class org.apache.spark.examples.JavaSparkPi \
~/spark/lib/spark-examples-1.5.1-hadoop2.6.0.jar \
100
The options and parameters are :
- –master : when running on YARN, 2 modes exist :
- yarn-client : runs the Driver on the client which submits the spark job. In this case, this creates a process on the master, from which I executed the command.
- yarn-cluster : runs the Driver on a slave node. This will create a process (for the driver) inside the ApplicationMaster container of one of the slave nodes.
- –num-executors : the number of executors. Each executor runs in its own YARN container.
- –executor-memory : the memory used for executors. This value is systematically padded with 384 MB overhead, so to reach exactly 1024 MB I chose the value 640 MB.
- –executor-cores : the number of cores to be used by each executor. The number of cores is also the number of parallel tasks that an executor can run.
- –class : the name of the Java class to use.
- 1st parameter : the jar containing the class to be executed and eventually other dependency libraries. Here it is the Spark example jar.
- 2nd to n-th parameters : input parameters for the Java application. Here we pass 100 as the number of samples to calculate Pi.
Each slave node runs 1 executor in a 1024 MB container. Each executor uses 2 cores.
Using the yarn-client mode
I prefer to use this mode because I execute all jobs from the master machine and it has plenty of available resource to run the Driver since it’s not doing any intensive computing like the slaves. It’s also under the same switch among all slaves so it’s as suitable as any other node to host the Driver.
Using this mode the default allocation size for the ApplicationMaster container is 1024 MB, which is good for having enough space to allocate another 1024 MB container for an executor on the same slave.
Using the yarn-cluster mode
In the case of “yarn-cluster” mode, the default container size for the ApplicationMaster is 1408 MB. This is too much, because it won’t leave enough space on the slave which runs the ApplicationMaster to create an executor.
To make this mode viable on these 2 GB RAM micro-servers, I have to add the option –driver-memory=256M when submitting a job. Because Spark takes this amount and adds 384 MB for the rest of the ApplicationManager, and an extra 384 MB of overhead. This gives 256 + 384 +384 = 1024 MB, which is back to the same amount as in yarn-client mode.
yarn-client VS yarn-cluster
Running a few tests, I noticed that in my case it is slightly faster to run the yarn-client mode, but really not much difference.
The disadvantage of yarn-client is that the spark-submit process needs cannot be interrupted since it is running the Driver during the whole application lifespan. This is not really a problem because anyways the master has to stay online. And you can always use a “nohup” command to run it in the background it you find it not convenient to stay connected via ssh.
Also, yarn-client is necessary for user input, in applications such as PySpark (for python) or spark-shell (for Scala).
Using more executors
Another way of running a job is to use 7 executors, to maximize the use of memory and cores :
- The slave which runs the ApplicationManager runs also an executor : (1024 MB + 1 core) + (1024 MB + 2 cores)
- Each of the 3 other slaves run 2 executors : 2 x (1024 MB + 2 cores)
But for me it turned out to take around the same speed (or less) as using 4 executors on most jobs. It probably doesn’t bring better performance because the MinnowBoard has only 2 physical cores. So I’d rather stay simple and stick with 1 executor per slave node.
Spark in Standalone
Configuration and Startup
In standalone mode, a default configuration is applied, and you can start jobs out of the box.
But to start the master and all slave nodes in one command we need to create the ~/spark/conf/slaves file on the master, which will be exactly like YARN’s slaves file :
ubuntu1
ubuntu2
ubuntu3
ubuntu4
To define Spark configuration values, create the ~/spark/conf/spark-env.sh . A template for this file already exists in the conf directory. I defined the following value in each node, to specify how much memory each worker has :
SPARK_WORKER_MEMORY=2g
To start or stop spark master and slaves, simply run these commands on the master host :
hduser@ubuntu0:~$ ~/spark/sbin/start-all.sh
hduser@ubuntu0:~$ ~/spark/sbin/stop-all.sh
Once started, you can check the cluster information and jobs on the Spark web UI at http://{MASTER}:8080 .
Running a job
Running a job in standalone is the same as on YARN, except that the “master” option takes in parameter the URI of the Spark master :
hduser@ubuntu0:~$ spark-submit \
--master spark://ubuntu0:7077 \
--class org.apache.spark.examples.JavaSparkPi \
~/spark/lib/spark-examples-1.5.1-hadoop2.6.0.jar \
100
In standalone mode, there is no ApplicationMaster to create the container-space problem one of the slaves, so I don’t bother to set all the optional parameters. I let Spark manage its workers by itself. And the results often turn out to be very similar anyways.
In the next part we will put Hadoop and Spark to use with an WordCount application, which we will benchmark.
Be First to Comment