
Now that we have deployed containers to have a Cassandra cluster and a Replicated MySQL cluster, it’s time to create the web application which will make use of them. We will create Docker images a proxied Django/uWSGI/Nginx web app, which will connect to the MySQL cluster for OLTP data (django authentication, sessions, etc…), and to the Cassandra cluster for OLAP data (stored user posts).
Contents
Introduction
Component Presentation
If you don’t know what Django/uWSGI/Nginx means, here is a quick presentation:
- Django: A popular Python web framework.
- MVC-based with pluggable modules.
- Includes powerful tools out-of-the-box (ORM, template engine, caching, etc…).
- Nginx: A web server.
- Better performance than Apache when serving static content, designed for high number of concurrent requests.
- But not able to serve dynamic content natively, unlike Apache with mod_python, mod_php, etc…
- uWSGI: A Python WSGI HTTP Server.
- Can serve as the dynamic interpreter for Nginx. It will be the link between Nginx and our Django app.
Objective
In this part, what we will do is run the web app as 2 containers. So we will need to create 2 Docker images:
- The webapp_django image
- The container’s main process will be uWSGI.
- The workers spawned by uWSGI will run the Django code inside the container.
- The webapp_nginx image
- The container’s main process will be Nginx.
- It will service static files directly, but forward dynamic requests to the Django/uWSGI container.
Using Nginx instead of Apache will give us better performance for static files and concurrent requests. If a client is requesting static content (e.g. css or images), then it will get its response very quickly from the Nginx container directly. If the request is for dynamic content (e.g. webpage url), then the request will be handed over to the uWSGI container and end up in the Django code.
The Django/uWSGI Image
Image source code: https://github.com/nicomak/[…]/webapp_django
Along with the Dockerfile, there are 4 other elements at the project root:
- files_django/: directory containing the Django source code.
- files_uwsgi/: directory containing uWSGI config files.
- requirements.txt: the Python requirements file, contains instructions on what python PIP packages to install.
- .dockerignore: contains what files to be ignored (e.g. by the COPY command) when building the image.
- Most of these files would have no have no use in the image because they are dev-mode-specific or auto-generated files.
The Dockerfile
Now let’s take a look at the important commands of the Dockerfile.
The gcc, python-dev, libmysqlclient-dev and libpq-dev package are necessary to install a few PIP packages which require building python extensions in C.
The following Dockerfile commands are to COPY the requirements.txt file to the image filesystem and RUN pip install -r on it. The requirements file contains django and uwsgi, but also mysql, postgresql and cassandra client libraries for python. We won’t be using PostgreSQL but I decided to include it just in case.
After that, we COPY all source files to the /app/ directory and use it as the working directory. It will contain all django sources and the uWSGI configuration file.
To be able to see some logs appear when running the docker logs <container> command, we must write those logs to /dev/stdout (or /dev/stderr for errors). We do this simply by creating symbolic links from our uwsgi log files to the stdout.
Django gathers static files from its sources folder into a centralized static_root folder from which it can later serve all static files. This can be done while building the image, by executing the python files_django/manage.py collectstatic –noinput command. The second sub-command copies the static root directory to the shared volume, so that it can later also be used by the Nginx container.
Finally, the CMD container startup command is to run uWSGI in emperor mode whilst passing it our custom configuration file, found inside /app/files_uwsgi/ (no need to specify /app/ because it is already the working directory, earlier defined with WORKDIR).
Organizing Layers to Optimize Build Time
You might wonder why I performed a COPY of requirements.txt first, if it is included with all source files during the second COPY anyways. This is a little trick to optimize build time. Docker caches the state of the image after each command. These states are called “layers”. If you modify the command corresponding to the 4th layer of an image, then Docker can re-use the first 3 layers from its cache, ad start re-building the image from the 4th layer only.
This is exactly what I was going for here. Running pip install is slow because it require downloading and building libraries. So it is better to run it before the COPY of the whole source code. The sources change often, because you would regularly update your Django code (python, html, css, etc…). If you need to rebuild the image because you decided to change the CSS color of an element, then it would be fast because the previous pip install layer was already cached. If you decided to run pip install only after copying all sources, then a small change in any file would expire the cache and require a full installation of the pip packages again.
The uWSGI Configuration file
The files_uwsgi/django_app.ini file defines how uWSGI must serve the django application. The 2 important fields are:
module = %(project_name).wsgi:application
socket = :29000
The module property points to the wsgi.py file, and more precisely to its application variable, which is the Django WSGI handler.
The socket variable is set to use TCP communication (using the uwsgi protocol) on port 29000.
The Django Code
Now let’s focus on how Django will communicate with the MySQL and Cassandra clusters.
Connection to MySQL
In the settings file, django_files/project/settings.py (view) I have configured 2 databases, which both point to the MySQL HAProxy which was set up earlier:
DATABASES = {
    'default': {
        'ENGINE': 'django.db.backends.mysql',
        'NAME': 'djangodb',
        'USER': 'root',
        'PASSWORD': 'root',
        'HOST': '192.168.0.200',
        'PORT': '3306',
    },
    'read_only': {
        'ENGINE': 'django.db.backends.mysql',
        'NAME': 'djangodb',
        'USER': 'root',
        'PASSWORD': 'root',
        'HOST': '192.168.0.200',
        'PORT': '3307',
    },
}

DATABASE_ROUTERS = ['project.routers.HAProxyRouter']
The first database uses port 3306 and will be used for write operations only, whereas the second one will use port 3307 for read-only operations.
The router specified in DATABASE_ROUTERS, in django_files/project/routers.py (view) defines which database is used for which type of operation.
Connection to Cassandra
The Cassandra client library was installed from the requirements.txt during the build of the image. Check out django_files/posts/models_cassandra.py (view) to see how to use the Cassandra client to communicate with the cluster. We pass it a few node IP addresses, defined in CASSANDRA_NODES in the settings file. From there it will auto-discover all cluster nodes and create a session for the keyspace posts_db we want to use.
Since Cassandra is a NoSQL database, it is not supported by Django’s database management or ORM. Instead, the client library uses its own base Model class. The PostModel class I created provides class methods to query and create posts in the Cassandra cluster.
The Nginx Image
Image source code: https://github.com/nicomak/[…]/webapp_nginx
The Dockerfile extends the official image nginx:1.11. The only customization needed was to be able to pass the URI of the uWSGI server to the container. To do that, I created a nginx.conf.tmeplate file containing a placeholder {{UWSGI_URL}} :
    upstream uwsgi_server {
        server {{UWSGI_URI}};
    }

    server {
        listen 80 default_server;

        location = /favicon.ico { access_log off; log_not_found off; }

        location /static/ {
            alias /shared/static_root/;
        }

        location / {
            include	uwsgi_params;
            uwsgi_pass 	uwsgi_server;

            uwsgi_param Host $host;
            uwsgi_param X-Real-IP $remote_addr;
            uwsgi_param X-Forwarded-For $proxy_add_x_forwarded_for;
            uwsgi_param X-Forwarded-Proto $http_x_forwarded_proto;
        }
    }
To replace the placeholder with the environment variable called UWSGI_URI at container startup, I created the entrypoint.sh script (view). If the variable is not specified, an error message is printed and the container does not start.
The first location instruction indicates that all paths starting with /static/ will point directly to the /shared/static_root/ directory on the file system. This folder will contain all static files from the Django application. It will need to be mounted onto the Nginx container.
The second location / takes all other requests and redirects them to the uWSGI server. The uwsgi_params module is provided in Nginx by default. All we have to specify is the uswsgi_pass parameter, which is an upstream server. This server will be the uWSGI/Django container on port 29000. The uwsgi_param instructions indicate extra uwsgi variables to pass to the uWSGI server. These are not necessary and I included them just for illustration.
Running the Containers
After building and pushing the images to Docker Hub (the same way as for the MySQL image in the previous post), I now have the following images ready to run on any of my nodes:
- Django/uWSGI image: nicomak/webapp_django
- Nginx image: nicomak/webapp_nginx
Let’s install the web app on a few nodes using slightly different approaches.
Starting the containers
On Ubuntu1: Using the Default Bridge Network
The containers can communicate if they know each other’s IP address on the default bridge network. So if we create the django container first, we have to :
# Start Django/uWSGI container called "wdjango"
dock@ubuntu1$ docker run --name wdjango -d nicomak/webapp_django

# Get the ip address of wdjango on the bridge network
dock@ubuntu1$ export WDJANGO_IP=$(docker inspect --format '{{ .NetworkSettings.IPAddress }}' wdjango)

# Start Nginx container called "wnginx"
dock@ubuntu1$ docker run --name wnginx --volumes-from wdjango -e UWSGI_URI=$WDJANGO_IP:29000 -p 80:80 -d nicomak/webapp_nginx
The Nginx container has to publish port 80 to be reached from outside the host. The django container’s port 29000 doesn’t need to be published because it is only used within the bridge network.
Also, notice the –volumes-from wdjango option. In the webapp_django Dockerfile, there was a VOLUME /shared instruction. This declared the /shared directory as an external data volume. So when using the volumes-from option, that data volume is mounted on the wnginx container as well. This enables Nginx to serve the static files from that volume.
On Ubuntu2: Using a Custom Bridge Network
# Create a custom bridge network called "localnet"
dock@ubuntu2$ docker network create --driver bridge localnet

# Start Django/uWSGI container on the localnet network
dock@ubuntu2$ docker run --net localnet --name wdjango -d nicomak/webapp_django

# Start Nginx container called "wnginx"
dock@ubuntu2$ docker run --net localnet --name wnginx --volumes-from wdjango -e UWSGI_URI=wdjango:29000 -p 80:80 -d nicomak/webapp_nginx
In this example we connected both containers to the custom network. User-defined networks have automatic name resolution, so in this case we don’t need to get the IP of the django container, we can simply pass the container name in the UWSGI_URI environment variable.
On Ubuntu[3+4]: Containers on separate hosts
# ubuntu3: Start the django container
dock@ubuntu3$ docker run --name wdjango -p 29000:29000 -d nicomak/webapp_django

# ubuntu4: Start Nginx container
dock@ubuntu4$ docker run --name wnginx -v /home/dock/static_files:/shared/static_root -e UWSGI_URI=192.168.0.203:29000 -p 80:80 -d nicomak/webapp_nginx
To use the containers on separate hosts, you must make sure that the uWSGI port 29000 is reachable from the other host, hence the -p 29000:29000 option. And then you can pass the host IP address to Nginx in the USWGI_URI variable.
Using the –volumes-from option is no longer possible to mount the static files directory, because the django container is not running on the same host. But what we can do is copy the files manually to the host (here in /home/dock/static_files) and then mount them manually to the nginx container.
Initializing Django
When running the app for the first time, the database tables must be created so that they can be mapped to the django models. You must first create a database called “djangodb” in your MySQL master, and then run the following commands on any webapp_django container:
# Create tables
$ docker exec -ti wdjango python files_django/manage.py migrate

# Create superuser
$ docker exec -ti wdjango python files_django/manage.py createsuperuser --username nicomak --email email@address.com
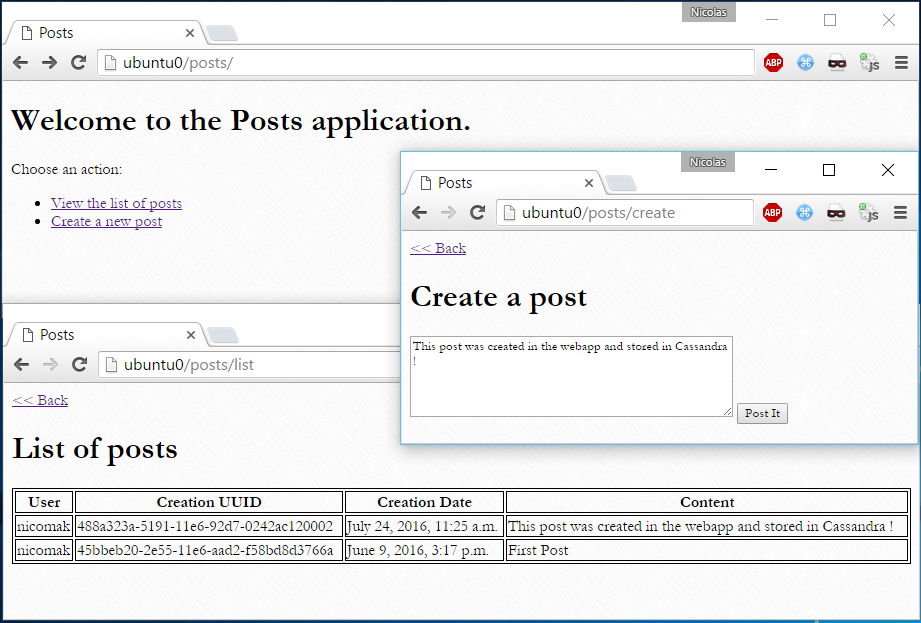
When this is done, you can log in the application and view/create your posts in Cassandra.
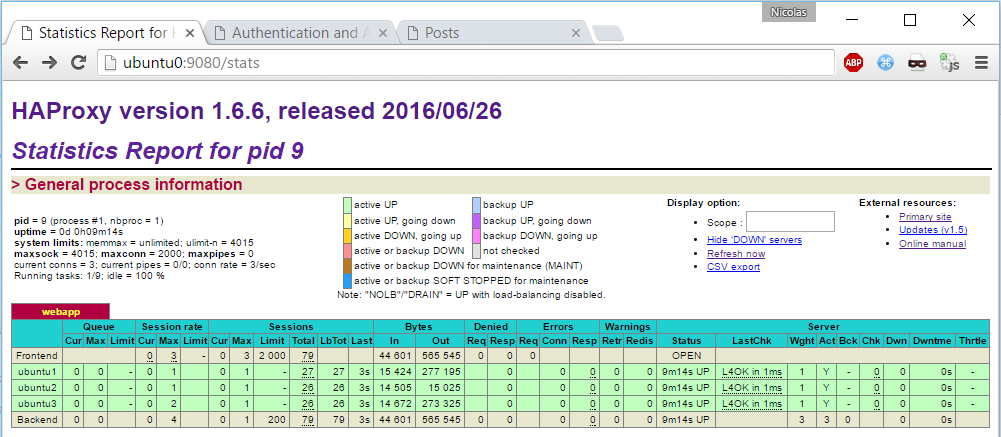
Load-Balancing with HAProxy
Using the same technique as we did for the MySQL load balancer, we can simply mount a configuration file on a HAProxy container. Here is a sample haproxy_webapp.cfg to load-balance all 3 nginx servers (previously started on ubuntu1, ubuntu2 and ubuntu4):
global
    log 127.0.0.1 local0 notice
    user root
    group root

defaults
    log global
    mode http
    retries 2
    timeout connect 3000
    timeout server 5000
    timeout client 5000

listen webapp
    bind 0.0.0.0:80
    mode http
    balance roundrobin
    option httpclose
    server ubuntu1 192.168.0.201:80 check
    server ubuntu2 192.168.0.202:80 check
    server ubuntu3 192.168.0.204:80 check

listen stats_page
    bind 0.0.0.0:9080
    mode http
    stats enable
    stats uri /stats
    stats realm Strictly\ Private
    stats auth admin:password
Sticky sessions are not necessary because by default Django stores session data in the database. The session data can be fetched by any instance as long as it receives the user’s cookie.
dock@ubuntu0$ docker run -d --name haproxy_webapp -v /home/dock/haproxy_webapp.cfg:/usr/local/etc/haproxy/haproxy.cfg:ro -p 80:80 -p 9080:9080 haproxy:1.6
Then all clients can communicate with the load balancer:
And of course the stats page should be working on port 9080:
Bonus 1: Using a Unix Socket
Using a unix socket to communicate between Nginx and uWSGI is slightly faster than using a TCP port, because of the overhead of packet encapsulation/decapsulation to go through the network stack. This is true even when on the same host and communicating through the loopback interface. By using the unix socket you gain a performance advantage but make your containers tightly coupled, as they cannot be deployed on separate hosts anymore.
To do this, first specify a unix socket in the uwsgi djangoapp.ini file:
socket = /shared/djangoapp.sock
chmod-socket = 664
And then change the nginx configuration file to set the same socket in the uwsgi_pass :
location / {
    include     uwsgi_params;
    uwsgi_pass  unix:/shared/djangoapp.sock;
}
Note that I placed the socket inside the /shared folder. There is no other choice but to put it in a shared volume, because both applications which run in separate containers must have access to it on the file system.
The image I created for the next bonus section uses a unix socket.
Bonus 2: Putting everything in a Single Image
Image source code: https://github.com/nicomak/[…]/webapp_allinone
It is also possible to put all components in a single image. That is, running both Nginx and uWSGI together as the container process. An easy way to achieve that is to use Supervisord.
First, create a file called supervisor.conf containing both uWSGI and Nginx commands:
[supervisord]
nodaemon=true

[program:uwsgi]
command = uwsgi --emperor /app/files_uwsgi --gid www-data --logto /var/log/uwsgi/emperor.log

[program:nginx]
command = nginx -g "daemon off;"
Then in the Dockerfile, you need to:
- Install the supervisor package.
- Create a copy or a symbolic link of the supervisor.conf file in /etc/supervisor/conf.d
- Call supervisord as the container CMD.
The main process of the container will be supervisor, who will run both Nginx and uWSGI.
Conclusion
Running everything in a single container on supervisor is easier to deploy, but using 2 separate containers has the following advantages:
- Resource isolation: You can limit specific amounts of CPU, memory and IOs to Nginx and uWSGI.
- Functional isolation: You can redeploy the Nginx container without having to touch uWSGI/Django container.
- Useful if your Nginx has a bug, or simply want to upgrade Nginx version (or switch to Apache), or modify the proxy settings to add a new component.
- This saves you the trouble of killing your Python app, which might have useful data in memory.
- Loosely-Coupled: Both containers can be deployed on separate hosts by using a TCP socket.
hello,
Can you give one git.
thx,
Great article, thanks a lot! Clear & helpful for novice in Docker.