 In the previous part we use the official Cassandra images from Docker Hub to start containers and have them form a cluster. In this post we will see how to create our own docker images to facilitate the deployment of a Master-Slave replicated MySQL cluster. We will also use a HAProxy container to load-balance our MySQL instances.
Contents
The Custom MySQL Image
MySQL has an official Docker image on Docker Hub. It is a simple image to start a MySQL instance with the given database name, user and password in the container environment variables. But unlike Cassandra, MySQL does not have an official or default way to be clustered, so the image does not provide a way to do it out of the box.
Master-Slave replication is one way of scaling out instances, and is usually configured manually. I have written a bash script, which I explained in a previous post, to automate this process. What we will be doing in this section is to extend the official MySQL image, and simply add a few replication configurations on top of it, and also enable using my automation script in the containers.
Understanding the Official Image
Since we will be extending this image, let’s first study how it works. To understand an image we must first look at its Dockerfile, because it is the file containing the instructions on how to build the image. So in a sense it is the definition of the image. It is usually referenced on the Docker Hub page. The Dockerfile and resources for the latest Docker image can be found in the official docker GitHub repo:
https://github.com/docker-library/mysql/tree/master/5.7
The first line of the Dockerfile contains FROM debian:jessie which means that the image is an extension of the debian:jessie image. This means they are taking an image containing a debian distribution, and will install mysql on top of it. The following lines are mostly ENV and RUN commands, to set default environment variables and run linux and debian commands to install mysql packages, change permissions, move files, etc… These are all the commands that actually install Mysql in the image.
At the bottom of the Dockerfile we can see a few important things:
- COPY docker-entrypoint.sh /usr/local/bin/: copy the script which sits next to the Dockerfile into the image’s filesystem.
- ENTRYPOINT [“docker-entrypoint.sh”]: When a container is started from this image, run the script as its main process.
- CMD [“mysqld”]: Pass “mysql” as the command argument to the entrypoint script.
So when you run a container using this image, the container already contains Debian with all MySQL binaries, and it runs the docker-entrypoint.sh script. In the same repo, next to the Dockerfile, open the script and take a look at what it contains. Most commands in this file read the environment variables passed during container startup, and prepare the database accordingly (database and user creation, privileges, etc…). The last line of the script is exec “$@” to run mysqld, which was automatically passed as the argument to the script, because it was the CMD value in the Dockerfile.
Creating the Custom MySQL Image
Source code of the custom image: https://github.com/nicomak/blog/tree/master/docker/rep_mysql
The DockerFile
FROM mysql:5.7

# Install all debian packages
RUN apt-get update && apt-get install -y \
    openssh-client \
    vim \
    net-tools \
    --no-install-recommends && rm -rf /var/lib/apt/lists/*

# Copy all source files to the container's working directory
COPY . /app/
WORKDIR /app/

# Default env variables for entrypoint script
ENV SERVER_ID 0
ENV BIND_ADDRESS 0.0.0.0

COPY new-entrypoint.sh /usr/local/bin/
ENTRYPOINT ["new-entrypoint.sh"]
CMD ["mysqld"]
The first instruction, FROM, shows that we extend the official image of mysql, version 5.7.
The second instruction, RUN, runs shell commands. In this case it installs a few APT packages on top of the base image. The openssh-client package is useful to use SCP protocol when we will transfer the mysql dump from master to slave(s). The vim and net-tools commands are not necessary but might be useful for debugging purposes inside the container.
After that the COPY instruction copies files to the image’s filesystem. Here I decided to copy all sources to the /app/ directory in the image filesystem.
The WORKDIR instruction defines the default directory from which relative paths are defined in other Dockerfile instructions. It is also the default directory when running commands in the container. For example when running a docker exec -ti <container> bash you will end up in the WORKDIR.
The ENV instructions define default environment variables which will be used in the container. These can be overridden by using the -e option when starting a container.
Finally, we define the ENTRYPOINT. This overwrites the entrypoint script from the base image.
The Entrypoint Script
The new entrypoint for this new image, new-entrypoint.sh, starts by creating the necessary configuration files for mysql replication. It replaces the environment variables in custom.cnf.template to produce /etc/mysql/conf.d/custom.cnf. It does the same thing with credentials.cnf.template to store user/password for remote commands later.
Then, if the container being created is destined to be a slave, and that the master’s IP address was defined in the environment variable AUTO_INIT_MASTER_IP for automatic replication activation, the replication script is started in background mode. The script will wait until mysql is started before activating the replication.
Finally, to start mysql, we simply call the old entrypoint script !
The Replication Script
This script is very similar to the script I explained in a previous post about MySQL replication automation, with a few little changes:
- The MASTER and SLAVES variables are now script parameters.
- The first argument is the IP of the master
- Subsequent arguments are slave IPs
- The remote mysql shell commands are authenticated by the credentials.cnf file instead of -u and -p parameters.
- In the case of slave auto-initialization, it will wait for MySQL to start.
- In the case of slave auto-initialization, skip sending the dump via SCP, because it is already on the slave.
Building the Image
Considering that you are in the directory where the Dockerfile is located:
dock@ubuntu0$ docker build -t rep_mysql .
dock@ubuntu0$ docker tag rep_mysql nicomak/rep_mysql:5.7
dock@ubuntu0$ docker push nicomak/rep_mysql:5.7
The first command build the image and calls it rep_mysql. After this command, you can already docker run the image locally because it exists in your local repo.
The second command tags the image with an DockerHub account prefix, and a tag suffix, which is the version 5.7 here. The third command pushes the image to Docker Hub, so that it can later be downloaded by any host connected to the internet. Note that for these 2 steps you need to create a Docker Hub account.
The image then gets its own page on Docker Hub, like this: https://hub.docker.com/r/nicomak/rep_mysql/
Running the MySQL containers with Replication
The image I have created is essentially a MySQL image but with extra configurations, and a script which can automatically initialize replication. This script can either be run anytime after the containers have started, or during a slave startup by passing it the IP address of its master in AUTO_INIT_MASTER_IP.
To illustrate its usage, let’s first create containers on 3 of my nodes: ubuntu1, ubuntu2 and ubuntu3:
dock@ubuntu1$ docker run --name db1 -e MYSQL_ROOT_PASSWORD=root -e MYSQL_DATABASE=djangodb -e SERVER_ID=1 -e BIND_ADDRESS=0.0.0.0 -p 3306:3306 -d nicomak/rep_mysql:5.7
dock@ubuntu2$ docker run --name db2 -e MYSQL_ROOT_PASSWORD=root -e MYSQL_DATABASE=djangodb -e SERVER_ID=2 -e BIND_ADDRESS=0.0.0.0 -p 3306:3306 -d nicomak/rep_mysql:5.7
dock@ubuntu3$ docker run --name db3 -e MYSQL_ROOT_PASSWORD=root -e MYSQL_DATABASE=djangodb -e SERVER_ID=3 -e BIND_ADDRESS=0.0.0.0 -p 3306:3306 -d nicomak/rep_mysql:5.7
The remote image pushed from ubuntu0 earlier will be downloaded automatically on these 3 hosts. Note that the commands could have all been run from ubuntu0 using ssh.
Then the replication can be started using the script within the container in ubuntu1:
dock@ubuntu1$ docker exec -ti db1 bash replication-start.sh 192.168.0.201 192.168.0.202 192.168.0.203

MASTER: 192.168.0.201
  - Waiting for database to be locked
  - Dumping database to /tmp/djangodb-export-20160704162249.sql
  - Dump complete.
  - Current log file is mysql-bin.000003 and log position is 597
  - Master database unlocked
SLAVE: 192.168.0.202
  - Creating database copy
  - Setting up slave replication
  - Slave IO state OK
SLAVE: 192.168.0.203
  - Creating database copy
  - Setting up slave replication
  - Slave IO state OK
This “grouped” replication with 2 slaves is optimized because the script locks and dumps the master only once for both slaves.
If we created a 4th instance (i.e. the 3rd slave) on ubuntu4, we could initialize its replication using the auto-initialization parameter:
dock@ubuntu4$ docker run --name db4 -e AUTO_INIT_MASTER_IP=192.168.0.201 -e MYSQL_ROOT_PASSWORD=root -e MYSQL_DATABASE=djangodb -e SERVER_ID=4 -e BIND_ADDRESS=0.0.0.0 -p 3306:3306 -d nicomak/rep_mysql:5.7
We can now create a table and insert rows in the master mysql instance on ubuntu1, and the changes will be automatically replicated to the slave nodes ubuntu[2-4].
Deploying a HAProxy container for Load-Balancing
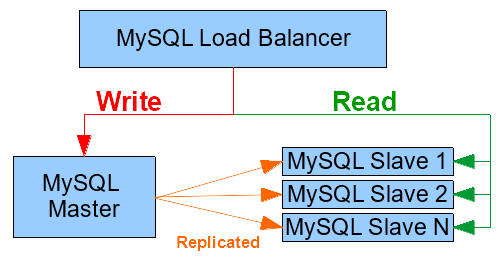
We now have 1 Master which replicates any changes to the djangodb database to the 3 Slaves.
To make good use of their replicated data and achieve collective performance and availability, we can use a Load Balancer. Luckily, HAProxy has an official image that we can use strait out-of-the-box. We won’t need to create our own image, but we will need to configure a few things first.
Create a User for Status Checks
The first thing we need to do is create a password-less MySQL user for HAProxy to perform its status checks.
If we create the user on the master ubuntu1, while using our replicated database djangodb, the user creation will be replicated on all slave nodes, which is convenient:
# Create user on the master
$ mysql -h ubuntu1 -uroot -proot djangodb -e "CREATE USER 'haproxy_check'@'%';"

# Check that is exists on a slave
$ mysql -h ubuntu3 -uroot -proot djangodb -e "SELECT user, host FROM mysql.user;"
+---------------+------+
| user          | host |
+---------------+------+
| haproxy_check | %    |
| root          | %    |
+---------------+------+
Create the HAProxy configuration
The next step is to write a haproxy_mysql.cfg configuration file which will define how HAProxy must behave. Here is an example I wrote:
global
    log 127.0.0.1 local0 notice
    user root
    group root

defaults
    log global
    retries 2
    timeout connect 3000
    timeout server 5000
    timeout client 5000

listen write_nodes
    bind 0.0.0.0:3306
    mode tcp
    option mysql-check user haproxy_check
    server mysql1 192.168.0.201:3306 check inter 2000 fall 3 rise 99999999
    server mysql2 192.168.0.202:3306 check backup

listen read_nodes
    bind 0.0.0.0:3307
    mode tcp
    option mysql-check user haproxy_check
    balance roundrobin
    server mysql2 192.168.0.202:3306 check
    server mysql3 192.168.0.203:3306 check
    server mysql4 192.168.0.204:3306 check

listen stats_page
    bind 0.0.0.0:8080
    mode http
    stats enable
    stats uri /stats
    stats realm Strictly\ Private
    stats auth admin:password
❗ Host IP addresses must be used in the configuration file instead of host names (ubuntu1, ubuntu2, etc…).
This is because the file will be used inside the container, which is not aware of those host names. As explained in the previous part, when using a the default bridge network, a container does not inherit of its host’s /etc/hosts file. You can use host names if you redefine the /etc/hosts file in your containers, or by use the host network stack on your container.
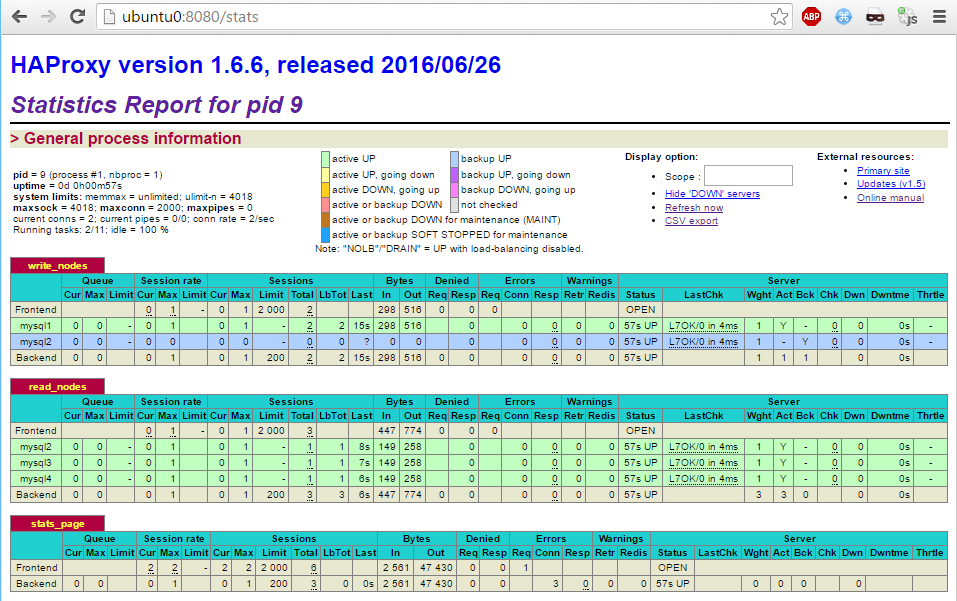
There are 3 listen groups:
- The write_nodes interface on port 3306
- We will use this only for writing instructions (Create, Insert, Update, etc…).
- Uses ubuntu1 as the only active server. We want all requests to go to our Master so that is can replicate changes to its slaves.
- Uses ubuntu2 as the backup. It will not be used until ubuntu1 dies.
- inter 2000 : Check the status of ubuntu1 every 2000 ms.
- fall 3 : If there are 3 consecutive failed checks, declare ubuntu1 as dead.
- rise 99999999 : Bring back ubuntu1 from the dead only after 99999999 checks.
- We actually want it to never come back, so we use a huge number of intervals.
- Because if it does come back, it will have missed some write operations and be outdated behind ubuntu2.
- The read_nodes interface on port 3307
- We will use this only for reading instructions (Show, Select, etc…).
- Balance the requests in a roundrobin fashion between the 3 slaves ubuntu2, ubuntu3 and ubuntu4.
- The stats_page on port 8080 and uri path /stats
- The UI to monitor server statuses and statistics.
- Uses authentication with credentials admin/password.
Running and Testing
To start a HAProxy 1.6 container on host ubuntu0:
dock@ubuntu0$ docker run -d --name haproxy_mysql -v /home/dock/haproxy_mysql.cfg:/usr/local/etc/haproxy/haproxy.cfg:ro -p 8080:8080 -p 3306:3306 -p 3307:3307 haproxy:1.6
The -v option mounts our haproxy_mysql.cfg to the container to be used as its main configuration file. The -p options expose the ports we need, which are the ports of the interfaces defined in our configuration file.
We can now test the 3306 and 3307 ports by checking on which instance the requests end up:
# Port 3306 always ends up on the master instance 1 (on ubuntu1)
$ mysql --port=3306 -h ubuntu0 -uroot -proot -N -e "SELECT @@SERVER_ID;"
+------+
|    1 |
+------+
$ mysql --port=3306 -h ubuntu0 -uroot -proot -N -e "SELECT @@SERVER_ID;"
+------+
|    1 |
+------+

# Port 3307 should arrive on slaves instances 2, 3 and 4 (on ubuntu[2-4])
$ mysql --port=3307 -h ubuntu0 -uroot -proot -N -e "SELECT @@SERVER_ID;"
+------+
|    2 |
+------+
$ mysql --port=3307 -h ubuntu0 -uroot -proot -N -e "SELECT @@SERVER_ID;"
+------+
|    3 |
+------+
$ mysql --port=3307 -h ubuntu0 -uroot -proot -N -e "SELECT @@SERVER_ID;"
+------+
|    4 |
+------+
The statuses and stats of should be viewable in the HAProxy UI:
Failover
So what we deployed in this part is a small MySQL Master-Slave replication cluster. The HAProxy is the gateway to the cluster resources:
- When called on port 3306, the requests are forwarded go to the Master only
- When called on port 3307, the requests are forwarded to the Slaves only
This way we have an instance dedicated to write operations, and load-balanced slave instanced to scale out read operations.
We have also a backup instance to take over write operations if the master dies. If that happens, however, manual intervention (or extra automated processes) must be used. The backup will have to be quickly declared as the new master for all slaves, otherwise the slaves will stay master-less and keep serving the outdated data. Ways to do this are:
- Use the mailers functionality (since HAProxy 1.6) to receive e-mail notifications about status changes.
- Then manually configure the master/slaves, or call my the replication-start.sh script.
- Create a cron job or daemon script to monitor the status of servers.
- It can call the stats uri at http://ubuntu0:8080/stats;csv to get the results in a CSV format, to be parsed more easily.
- Use the replication-start.sh script to reconfigure replication with the new master.
In the next part we will create our Django web application. Based on what we did here, the web apps will have to communicate with the HAProxy server, and know when to use the port 3306 or 3307 based on the type of MySQL requests.
hello ,
awesome config. but i didnt get one thing. How will haproxy know that its a read request and then forward to the read slave backend ? i dnt get that .
Does it means that application forwarding read request to haproxy but be configure on port 3307 . in other words the application send sql request in two port to haproxy ?
help , i didnt get that piece
Hello Manjeet,
I guess you are right! HAProxy can not determine which query is read or write! the back-end mode is a simple TCP bind. It understand only port numbers, it can not distinguish between queries types!
The application must maintain two connection, and use the right port for the each query.