![]() In this part, I will explain how I installed and configured the Ubuntu Server OS (along with the necessary tools and libraries) and network settings in order to prepare each node for Hadoop and Spark.
In this part, I will explain how I installed and configured the Ubuntu Server OS (along with the necessary tools and libraries) and network settings in order to prepare each node for Hadoop and Spark.
I wrote this part as a memo for myself and also to help out beginners who are not comfortable with Ubuntu and networking. It can be useful as well for people who have some trouble specifically with the Minnowboard MAX.
If this doesn’t concern you, you may directly move on to the next part.
Contents
Installing Ubuntu
Here are the steps I followed to install Ubuntu Server on each MinnowBoard MAX.
First we need to create a Bootable drive from which to run the installer. Then it’s only following the installer’s instructions.
Creating a bootable Thumb Drive
- Download the .iso file of Ubuntu Server 14.04 LTS on this page: http://www.ubuntu.com/download/server
- Download “Universal USB Installer” from this page: http://www.pendrivelinux.com/universal-usb-installer-easy-as-1-2-3/
- Plug an empty Thumb Drive (≥ 2 GB) to your computer and execute Universal USB Installer :
- Select “Ubuntu Server Installer” for the distribution.
- Select the .iso just recently downloaded in step 1.
- Select the USB Thumb Drive where to create the installer.
- Click Create.
Preparing the MinnowBoard
Before running the installation plugging in our Thumb Drive, there is a problem that needs to be solved. The MinnowBoard only has 2 USB ports (1 x USB 2.0 + 1 x USB 3.0). However we need at least 3 of them for this process.
So by buying a 4 x USB 2.0 hub, I got a total of 4 x USB 2.0 + 1 x USB 3.0, which enables me to plug the following devices :
- External HDD (on the USB 3.0)
- Bootable Thumb Drive (on the hub)
- A USB Keyboard (on the hub)
- Ubuntu Server is designed to use only a keyboard, but if you are running Ubuntu Desktop you might also want to plug in a mouse (on the hub)
Now we need a screen. The MinnowBoard has a Micro-HDMI port. If you have a screen that supports HDMI, then all you need is a “Micro-HDMI to HDMI” cable.
Warning : However, if you have a screen which only has VGA, it’s a bit more difficult. I haven’t succeeded using my VGA-only screen. “Micro-HDMI to VGA” cables only exist as “Male to Female” adapters. I bought one. Didn’t work. Went back to the shop. Had it replaced with another model. Didn’t work either. Gave up.
Running the Installer
First, make sure one of the ports of the switch is connected to your home router, because the installer needs Internet access.
When you switch on the MinnowBoard and wait, you get to an EFI Shell. There are 2 ways to run the installer :
- Use this shell to browse your Thumb Drive and manually execute BOOTx64.EFI (not recommended unless you know EFI Shell syntax)
- Type “exit” and you enter a menu, where you choose “Boot Menu” and then a list of devices are displayed. Select “EFI USB Device” to run it.
You are now running the Ubuntu Installer. Select Install Ubuntu, and follow the instructions. I turned to all the minimal choices (no libraries to install, no automatic updates) to keep my tiny computers simple and stable.
I used the user “nico” during installation and I gave the following hostnames to my 5 nodes : ubuntu0, ubuntu1, … ubuntu4.
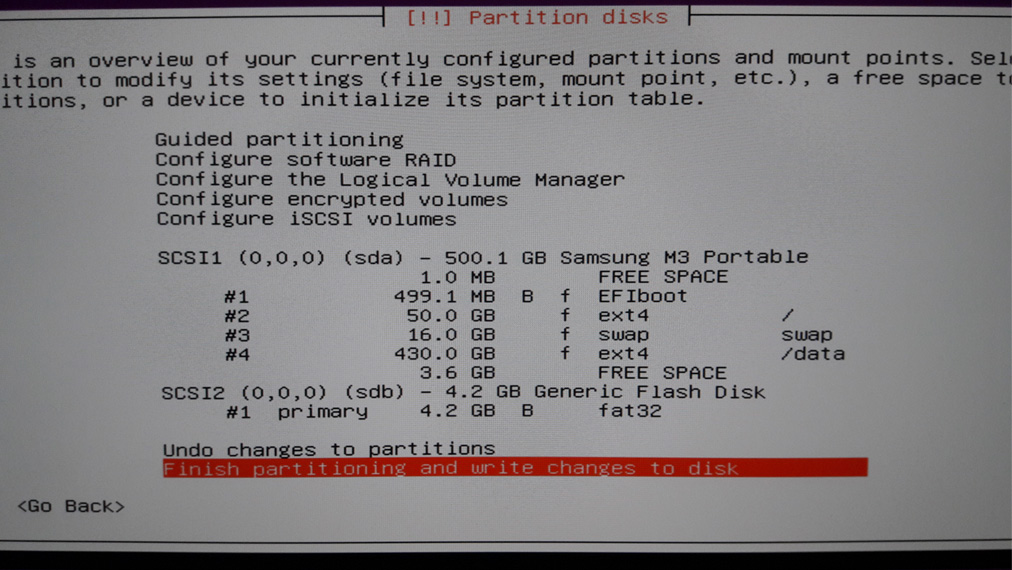
Below is a screenshot of how I partitioned a 500GB HDD.
I kept a 50GB partition for the OS, and a larger 400+ GB partition for application data (Datasets, HDFS) usage. I used 16 GB of swap because with only 2 GB of RAM I was a bit paranoiac.
After installation it will reboot. Log in to your user and install ssh :
sudo apt-get install ssh
Now find out your IP address :
hduser@ubuntu0:~$ ifconfig

lo        Link encap:Local Loopback
          inet addr:127.0.0.1  Mask:255.0.0.0
          UP LOOPBACK RUNNING  MTU:65536  Metric:1
          RX packets:214585 errors:0 dropped:0 overruns:0 frame:0
          TX packets:214585 errors:0 dropped:0 overruns:0 carrier:0
          collisions:0 txqueuelen:0
          RX bytes:71915061 (71.9 MB)  TX bytes:71915061 (71.9 MB)

p2p1      Link encap:Ethernet  HWaddr 00:13:20:fe:54:67
          inet addr:192.168.0.4  Bcast:192.168.0.255  Mask:255.255.255.0
          UP BROADCAST RUNNING MULTICAST  MTU:1500  Metric:1
          RX packets:38868452 errors:0 dropped:0 overruns:0 frame:0
          TX packets:26329988 errors:0 dropped:0 overruns:0 carrier:0
          collisions:0 txqueuelen:1000
          RX bytes:43375019022 (43.3 GB)  TX bytes:34545514077 (34.5 GB)
The first block called “lo” is the loopback, don’t pay attention to it. The “p2p1” in the real Ethernet port. Important information here is :
- My address is 192.168.0.4 and it was assigned by my router.
- My MAC address (referred to as HWaddr) of this machine is 00:13:20:fe:54:67
On most home routers (like mine anyways), the IP address is assigned randomly at first, and then won’t change. So I guess you can use this IP Address as your host, write it down somewhere.
However, if you have access to your router’s management UI, you can set a “static” IPs to your host by reserving an IPs for the given MAC Address.
When using the MAC address obtained above by ifconfig, the format might need to be changed, by replacing columns by dashed and using upper-case, as seen below in TP-LINK router :
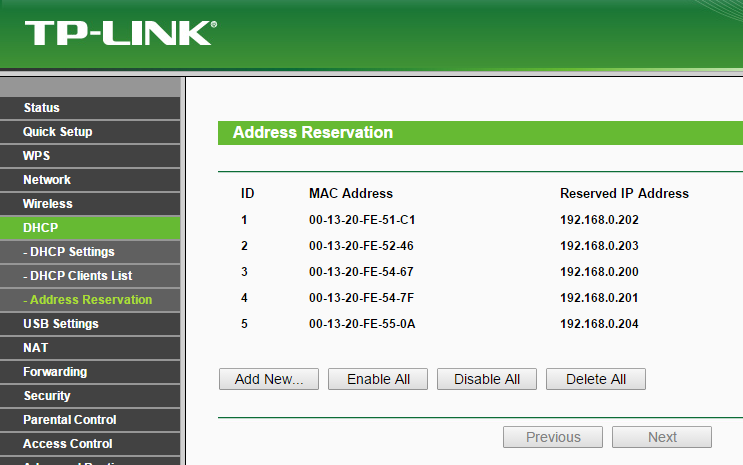
In addition to guaranteeing permanent IPs, this can improve readability. In my case, I have reserved the address “192.168.20x” with “x” being the host number, so it’s easy to memorize each host’s address.
Now that you know your IP address you may do everything by distance through SSH, so you can disconnect the USB hub and the video cable, and move on to the installation of the next host. The only necessary connected device now is the external HDD (make sure it’s on the USB 3.0 port for best performance).
Further Preparation
Basic Tools and Connectivity
First, install vim. I usually use “vi” for text editing, which is already installed with Ubuntu, but it has no coloring and lots of glitches, until you install vim (go figure) :
$ sudo apt-get install vim
As you might have noticed, it took quite some time to connect by ssh (around 5 sec). If you have this problem, you can disable the client hostname reverse DNS lookup by doing :
$ sudo vi /etc/ssh/sshd_config
and adding an extra line at the end, containing : UseDNS no
I also installed an FTP server on each host. It’s not necessary for Hadoop or Spark but useful to transfer big data sets. After installation, I needed to edit the /etc/vsftpf.conf configuration file and uncomment write_enable=YES to enable sending files to the host.
$ sudo apt-get install vsftpd

## Edit conf and uncomment the line which contains : write_enable=YES
$ sudo vi /etc/vsftpd.conf

## Restart
$ sudo service vsftpd restart
Disabling IPv6
There have been some network-related problems with hadoop when IPv6 is activated. To avoid such problems, deactivate it by editing the following file :
$ sudo vi /etc/sysctl.conf
and add the following lines at the end of the file :
#disable ipv6
net.ipv6.conf.all.disable_ipv6 = 1
net.ipv6.conf.default.disable_ipv6 = 1
net.ipv6.conf.lo.disable_ipv6 = 1
Reboot and then check if IPv6 was successfully deactivated (the second command must return “1” if deactivated) :
$ sudo reboot
$ cat /proc/sys/net/ipv6/conf/all/disable_ipv6
Finally, you must edit the /etc/hosts file so that each host knows each other host’s name :
$ sudo vi /etc/hosts
Set the hosts in the top block to march each host’s IP address with its hostname. In my case it was like this :
127.0.0.1 localhost
192.168.0.200 ubuntu0
192.168.0.201 ubuntu1
192.168.0.202 ubuntu2
192.168.0.203 ubuntu3
192.168.0.204 ubuntu4
If you have too many hosts, or can’t set reserved IPs in your router, an alternative to defining everything statically in this file is to install a DNS server on one of the hosts. For this tiny cluster I only had 5 nodes so I didn’t bother to do that.
Installing Java
Hadoop and Spark both run on Java, so our final task before making the cluster ready is to install Java.
I chose to install Java 1.7.0_21 because it looked like the most stable Oracle JDK for Hadoop based on this Wiki.
### Create installation directory
$ sudo mkdir /opt/jdk
$ cd /opt

### Download archive
$ sudo wget --header "Cookie: oraclelicense=accept-securebackup-cookie" http://download.oracle.com/otn-pub/java/jdk/7u21-b11/jdk-7u21-linux-x64.tar.gz

### Unpack
$ sudo tar -zxf jdk-7u21-linux-x64.tar.gz -C /opt/jdk

### Update Ubuntu alternatives symbolic links
$ sudo update-alternatives --install /usr/bin/java java /opt/jdk/jdk1.7.0_21/bin/java 100
$ sudo update-alternatives --install /usr/bin/javac javac /opt/jdk/jdk1.7.0_21/bin/javac 100
We can now install Hadoop and Spark.
Be First to Comment