Here is an easy way of running PySpark on IPython notebook for data science and visualization.
There are methods on the web which consist in creating an IPython profile or kernel in which PySpark must be started with other necessary jars. These methods can seem a bit complicated, and not suitable for all versions of IPython, especially for the newest versions where the profiles are deprecated because they were merged into the Jupyter configs.
So this is a simple way to run PySpark with a basic default IPython configuration, in 10 minutes, for any version of IPython later than 1.0.0.
![]()
We will use the Anaconda python distribution, because it can quickly install IPython and all the necessary scientific and data analysis tools by running a single installation script.
Install Anaconda on all nodes
First, download the installation script from https://www.continuum.io/downloads into your hadoop/spark user’s home folder, and to install it, simply run :
hduser@ubuntu0:~$ bash Anaconda2-2.4.0-Linux-x86_64.sh
This will install anaconda in a folder called anaconda2, and at the end of the script, you will be asked if you want it to add anaconda to your path in your ~/.bashrc file. You can say yes, but anyways you’ll have to modify it yourself after the installation.
Edit ~/.bashrc and move to added line to the beggining of the file. In ubuntu, the beginning of your should look like this :
# ~/.bashrc: executed by bash(1) for non-login shells.
# see /usr/share/doc/bash/examples/startup-files (in the package bash-doc)
# for examples

# added by Anaconda2 2.4.0 installer
export PATH="/home/hduser/anaconda2/bin:$PATH"

# If not running interactively, don't do anything
case $- in
    *i*) ;;
      *) return;;
esac
We need to do this because the “case” clause from lines 9 to 12 will exit the script if you are not logging in interactively. And in our case, we will need anaconda to be set in the path whenever an ssh command is executed remotely by Spark for this user (which is non-interactive).
These installation steps should be repeated on all cluster nodes.
Configure the Master
Now, all we have to do is create aliases, at the end of ~.bashrc :
# Aliases for running PySpark with IPython notebook
IPYTHON_BASE_OPTS='IPYTHON_OPTS="notebook --ip=ubuntu0 --notebook-dir=~/notebooks_ipython"'
alias inb_local="$IPYTHON_BASE_OPTS ~/spark/bin/pyspark --master local[*]"
alias inb_stand="$IPYTHON_BASE_OPTS ~/spark/bin/pyspark --master spark://ubuntu0:7077"
alias inb_yarn="$IPYTHON_BASE_OPTS ~/spark/bin/pyspark --master yarn-client --num-executors 4 --executor-cores 2 --executor-memory 640M"
Note that I used ~/notebooks_ipython as the root of the UI file tree to store all notebooks and files, but you can specify your preferred (existing !) directory. Or if you don’t specify it, the user’s home directory will be used, but that’s a bit messy, and not so safe because you can delete files from the UI.
And that’s it ! Now just re-login in ssh and then you can run :
- $ inb_local to run IPython Notebook using a local Spark.
- $ inb_stand to use Spark in Standalone mode.
- $ inb_yarn to use Spark on YARN.
Instead of creating and configuring an IPython profile, this uses the PySpark executable while passing the IPYTHON_OPTS. This works with any version of IPython after 1.0.0.
Example
By default, the IPython Notebook UI is accessible at http://{HOST}:8888 , which is nice because it does not conflict with any Hadoop or Spark default ports.
After running the IPython notebook on standalone mode, here is a python example of the Word Count I used in my Cluster’s benchmark, with a bit of SparkSQL and plotting :
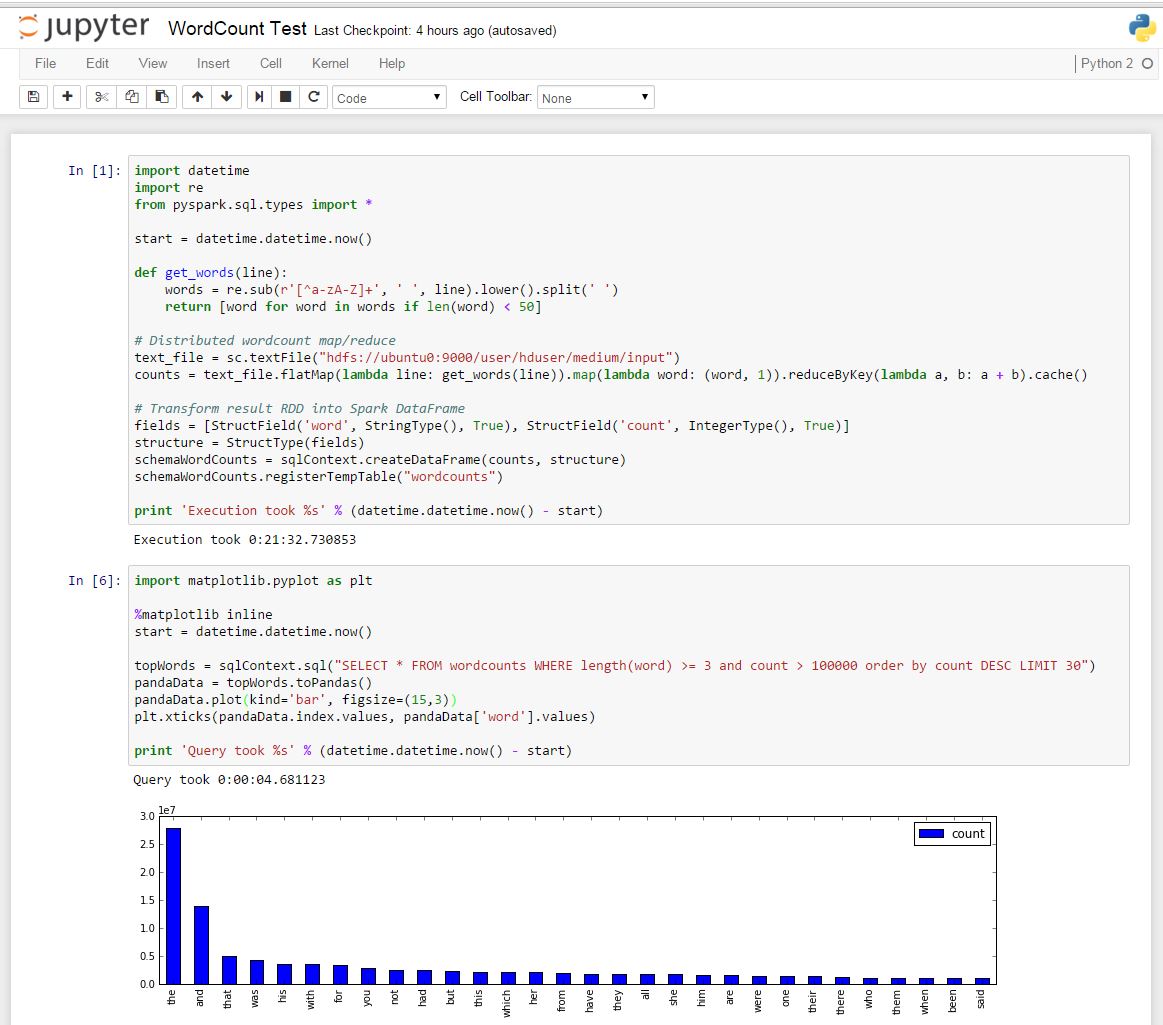
You can view the notebook with selectable code here.
Running the Word Count on Pyspark is quite slow (~20 min against ~5 min using Java). However creating the distributed DataFrame is quite fast (~1 min) and querying only takes a few seconds.
DataFrames is a Scala API and is supposed to have the same speed in all Spark languages. However for basic processing jobs such as this Word Count example, using Scala can be a lot faster.
My next post will be on how to installa and use the Zeppelin Notebook, which natively supports both Scala and Python Spark interactive shells.
i was strugglin with the configs of ipython 4.0, finally i used your technique. thanx !!
I’m glad it helped someone 🙂
This technique is indeed quick and simple if you use Spark, but we will eventually still have to deal with IPython’s profile/configuration stuff for more advanced kernel or plugin settings.
There is more info on this here : http://jupyter.readthedocs.org/en/latest/migrating.html
But it’s funny because when using IPython 4.0.0, I saw that it still creates the “default” profile in “~/.ipython” during the first execution. So I don’t really understand how can profiles be deprecated when IPython still creates and uses the default profile …
If someone knows more about this, please enlighten us !